For my training last year I decided to have a play with serverless architectures. This idea continues the trend of microservices by decomposing applications into stateless functions that are deployed to a cloud service.
Why take this approach? Aside from the obvious benefit of no longer having to manage servers, deploying at this level allows the provider to automatically scale up your application as demand increases. Conversely, when idle, resources can be deallocated to dramatically reduce your hosting costs.
A chatbot is a great fit for this style of architecture as it is dormant most of the time, only springing into life momentarily to respond to messages. I didn’t want to spend time worrying about AI so I decided to write a frivolous bot to demonstrate the approach. This bot purports to save users valuable time by automatically reacting to messages with a tenuously related emoji, so they don’t have to.
AWS Lambda
Many of the big cloud providers offer functions as a service (FaaS): AWS Lambda, Google Cloud Functions and Azure Functions. Besides the fact that AWS are currently offering a Free Tier that allows full use of their services for one year at zero cost, Lambda is one of the most popular and widely supported platforms, so I duly signed up.
Lambda presents a simple compute service that allows functions to be created that target one of the supported runtimes: C#, Java, Node.js and Python. Function code can either be input inline using the browser-based console or uploaded programmatically with a tool such as AWS CLI. Once created, invoking a function causes AWS to allocate sufficient compute resources, execute the function against its chosen runtime, and then return the result.
Although functions can be invoked in isolation, they are typically executed as a result of external event sources such as HTTP requests or SNS notifications. Lambda calls these event source mappings triggers. To trigger a function over HTTP requires an endpoint, known as an API Gateway in AWS, which is configured with mappings from resource paths and HTTP methods to Lambda functions.
So what does an actual Lambda function look like? For my chatbot I decided to use the Node.js runtime due to its fast start up time. Here’s the canonical hello world example:
module.exports.hello = (event, context, callback) => {
    callback(null, {body: 'Hello world!'});
};
Here we are exporting a function named hello that is configured as the Lambda’s entry point. The function accepts the trigger event, which in our case is an HTTP request, and responds via the supplied callback with either an error or a result which is then written to the HTTP response. This translation to and from HTTP is performed by a Lambda proxy that AWS automatically configures.
Serverless Framework
Deploying functions to AWS Lambda using the console or command line is fine for getting started but it soon becomes arduous for anything non-trivial. A few tools have emerged to fill this space such as the Serverless Framework and Claudia.js. Although it currently only supports AWS Lambda, I opted for the former as it aims to abstract your application away from the cloud provider, with Azure Functions and Google Cloud Functions integrations in the pipeline.
Once installed, the Serverless Framework provides a serverless (or sls) command that operates on a model of your application’s architecture, or stack, defined in a serverless.yml file. Here’s an example for our previous hello world function:
service: helloworld

provider:
  name: aws
  runtime: nodejs4.3

functions:
  hello:
    handler: handler.hello
    events:
      - http: GET hello
Here we are defining a service, which is a collection of related functions, called helloworld. This service declares a single Lambda function named hello with a handler of handler.hello; syntax for the JavaScript function hello exported from the Node module handler.js. We also configure a trigger to invoke the function when the HTTP request GET /hello is received.
To deploy this stack to AWS we simply type sls deploy:
$ sls deploy
Serverless: Creating Stack...
Serverless: Checking Stack create progress...
.....
Serverless: Stack create finished...
Serverless: Packaging service...
Serverless: Uploading CloudFormation file to S3...
Serverless: Uploading service .zip file to S3 (397 B)...
Serverless: Updating Stack...
Serverless: Checking Stack update progress...
..............................
Serverless: Stack update finished...
Service Information
service: helloworld
stage: dev
region: eu-west-1
api keys:
  None
endpoints:
  GET - https://xxx.execute-api.eu-west-1.amazonaws.com/dev/hello
functions:
  helloworld-dev-hello: arn:aws:lambda:eu-west-1:123:function:helloworld-dev-hello
Serverless has transformed our stack into an AWS CloudFormation file and sent it to AWS to configure. Our Lambda is now live. The output tells us the endpoint for our function, so let’s invoke it:
$ curl https://xxx.execute-api.eu-west-1.amazonaws.com/dev/hello
Hello world!
It works! Now we just need to turn this into a chatbot.
Slack bots
At Black Pepper we’re big fans of Slack so it made sense to write my chatbot for that platform. Slack provides two APIs for bot integration: the Real Time Messaging API and the Events API. The former uses WebSockets to pass events over a persistent connection, whereas the latter invokes a specified endpoint for certain events. Understandably, the transient nature of AWS Lambda means that it does not support WebSockets, so we’ll have to adopt the Events API.
In this scenario we’ll subscribe our Lambda’s endpoint to Slack’s message.channels event so that it’ll be notified whenever a message is posted in a channel. Our function will receive a JSON representation of the message in a POST request body, process it asynchronously, and acknowledge receipt with an HTTP OK response. Once the message has been processed, we can then send a reply back to the Slack channel by using the Web API.
Let’s take a look at how this would be implemented in our Lambda:
const WebClient = require('@slack/client').WebClient;

module.exports.event = (event, context, callback) => {
    const jsonBody = JSON.parse(event.body);
    const response = {statusCode: 200};

    switch (jsonBody.type) {
        case 'event_callback':
            if (jsonBody.event.type === 'message' &&
                jsonBody.event.subtype !== 'bot_message') {
                // TODO: Use a real OAuth access token
                new WebClient('xoxb-XXXXXXXXXXXX-TTTTTTTTTTTTTT').chat
                    .postMessage(jsonBody.event.channel, jsonBody.event.text)
                    .catch(error => console.log(error));
            }
            break;
    }

    callback(null, response);
};
Slack events are delivered as an outer event that wraps up the actual subscribed event. Here we unwrap the message event, carefully ignoring bots to avoid responding to ourselves, and echo the message’s text back to Slack using the Node SDK wrapper around the Web API.
Now that we know what our Lambda will look like, how do we configure Slack to send events to it? The recommended way is to create a Slack app for our endpoint and subscribe to events that we are interested in. Before Slack will accept our endpoint it first attempts a one-off URL verification handshake. This involves it sending us a url_verification outer event with a challenge attribute that we echo back in the HTTP response. This verifies that we control the endpoint.
To implement this we can add another event type handler to our Lambda:
case 'url_verification':
    response.headers = {'Content-Type': 'application/x-www-form-urlencoded'};
    response.body = jsonBody.challenge;
    break;
We should now be able to successfully receive events from Slack. Responding to them, though, is a different matter. For this we need an OAuth access token.
OAuth
Slack’s Web API uses OAuth 2.0 to authenticate requests which requires an OAuth access token to be supplied for every API call. Obtaining an access token involves first registering our bot as a Slack app, as we did when subscribing to events. This provides us with a client id and a client secret that we can then use to perform the OAuth dance.
To initiate the dance we present the user installing our bot a Slack button. This button requests authorisation from the user for our bot to access their team. If granted, Slack then passes a temporary authorisation code to a redirect URL configured in the app’s OAuth settings. We then exchange this temporary code with Slack for a permanent OAuth access token that we can use to post messages.
To achieve this convoluted process I added two further Lambda functions to my Serverless service: install and authorized. The first is the entry point for a user to install the bot and simply returns a HTML page containing the Slack button. The second is configured as my app’s OAuth redirect URL and performs the OAuth token exchange.
We’re almost there, but it’s worth quickly discussing a couple of subtleties with this process.
Sensitive data
When obtaining the OAuth access token from Slack we need to supply the client secret. As the name implies we probably shouldn’t embed this into our code, instead we should pass it to our function as an environment variable. Fortunately both AWS Lambda and Serverless have support for environment variables.
Let’s add a couple of environment variables for the OAuth client credentials to our serverless.yml file:
provider:
  ...
  environment:
    CLIENT_ID: ${file(local.yml):slack.clientId}
    CLIENT_SECRET: ${file(local.yml):slack.clientSecret}
This references a local.yml file containing the sensitive values that we do not commit:
slack:
  clientId: "111111111111.222222222222"
  clientSecret: abcd1234abcd1234abcd1234abcd1234
Persistent data
If your attention hasn’t waned yet, you may be wondering how do we pass the OAuth access token from the authorized function to the event function when Lambdas are indeed stateless? For this we use AWS DynamoDB to persist the access token and retrieve it when we want to post a message.
Serverless allows arbitrary AWS resources to be configured as part of your stack. Let’s add a DynamoDB table to our serverless.yml that can store access tokens:
resources:
  Resources:
    accessTokenTable:
      Type: AWS::DynamoDB::Table
      Properties:
        TableName: accessTokenTable
        AttributeDefinitions:
          - AttributeName: teamId
            AttributeType: S
        KeySchema:
          - AttributeName: teamId
            KeyType: HASH
        ProvisionedThroughput:
          ReadCapacityUnits: 1
          WriteCapacityUnits: 1
This table allows us to store multiple OAuth access tokens keyed by Slack team id, enabling our chatbot to be used across multiple teams. For example, to store an access token against a given team we can use the AWS SDK to write the following:
const AWS = require('aws-sdk');

const database = new AWS.DynamoDB.DocumentClient();
const params = {
    TableName: 'accessTokenTable',
    Item: {
        teamId: teamId,
        botAccessToken: botAccessToken
    }
};
database.put(params).promise()
    .catch(error => console.log(error));
The code to retrieve the access token is not too dissimilar. We must also add an AWS IAM role to our serverless.yml file to allow the functions to access this table:
provider:
  ...
  iamRoleStatements:
    - Effect: Allow
      Action:
        - dynamodb:GetItem
        - dynamodb:PutItem
      Resource: arn:aws:dynamodb:eu-west-1:*:*
Finally… emojis 😃
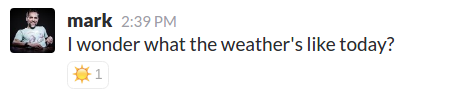
Now that the infrastructure is in place we can finally focus on the chatbot itself. Cast your mind back to the start of this blog and I proposed writing a chatbot that reacted to messages with relevant emojis.
I’ll spare you the detail but the crux of the implementation goes roughly as follows: chop up the incoming message into words; remove stop words; turn plurals into singulars; map words to emojis using synonyms scraped from the Emoji cheat sheet; pick one at random; and react to a channel message or reply to a direct message.
Behold the power of emojibot:
The full source code is available on GitHub if you’d like to browse the finished product. Happy chatbotting! 😂